Saturday, 18 February 2023
  5 Replies
  838 Visits
0
Votes
Undo
  Subscribe

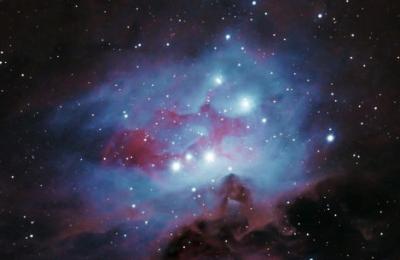
I have been playing around with slightly different processes of an OSC image of the Rosette Nebula, and I am interested in your comments and preferences. Which processing do you think does most justice to the object?

Combining data from a number of projects I accumulated 9 hours exposure (jobs - 1974, 2009, 1507) 

I passed the data through my usual Pixinsight process - WBPP, DynamicBackgroundExtraction, BlurExterminator, SpectrophotometricColorCalibration, EZ Denoise, Starnet2 separation of stars and nebula.

The star mask I stretched with ArcsinhStretch.

The nebula I processed in two ways. First MaskedStretch, then either using GeneralizedHyperbolicStretch, focusing on enhancing the contrast on the nebula structures, or CurvesTransformation, trying to keep more of the background nebulosity/dust visible. After the stretch a small amount of LocalHistogramEqualization to bring out some of the structures. Then recombining with the stars using PixelMath and the max(star_mask, starless) function

Using the generalized hyperbolic stretch I get Rosette1.jpg. Lots of punch, but I have lost some of the outer nebulosity.

Using the curves transformation, which I have had more practice with, I get Rosette2.jpg. A softer rendition with more of the outer nebulosity and dust visible, but not so much contrast in the main nebula structure.

Well, could I combine the best of both?

Rosette3.jpg uses the max function in PixelMath to choose the brighter of the two pixels from the original images. This keeps the background nebulosity and dust, but strengthens the contrast and colour in the main nebula. Rosette4.jpg uses PixelMath to average Rosette1 and Rosette2.

Would like to hear your comments.

0
Votes
Undo

Hello Richard, 

An excellent article which I hope, after maybe being updated should it receive any constructive comments, will be added into the Imaging Tips section, so's not to 'disappear'. Especially useful for those in the early stages of learning Pixinsight given the suggested workflows to achieve different results. How relatable to apps other than pixinsight I don't know, but I suspect many have equivalents.

Picking a favourite or two is down to personal preference so I will not be doing so. All the main elements that I believe make a good image are in each one. Not in any particular order, good control of noise, avoidance of harsh clipping, good level of sharpness, good star shapes and colours. You could maybe add composition, but given that no matter where on the globe we live, there is a limited amount we can do about that within the constraints of our imaging setup.

Thanks for putting the time and effort into this and sharing. :) Taking a screenshot for my own reference purposes.

Cheers, 

Ray 


Ray
Roboscopes Guinea Pig


1 year ago
·
#5904
0
Votes
Undo

Thanks Ray.

The fact that we have 9 hours data on this target helped enormously. Good data makes for a good start. It is a shame that so much of job 1507 was clouded, otherwise we would have had even more to play with.

1 year ago
·
#5950
0
Votes
Undo

So this is, for the moment, the final version.

I sought advice from other experienced imagers and Olly Penrice from 'Les Granges' in Southern France commented that he expected to see a bit more detail in the main nebula, and wondered whether the use of noise reduction at an early stage had damaged the image. He suggested only using NR on the fainter parts of the image.

So I reprocessed as follows.

Calibrated and stacked in WBPP > DynamicBackgroundExtraction > BlurExterminator > SpectrophotometricColorCalibration > StarNet2

So now I have a Starless and a star_mask image.

I stretched the Starless image using only GeneralizedHyperbolicStretch. Then used RangeSelection to create a mask protecting the nebula and applied EZ Denoise to the background.

I followed that with DarkStructureEnhance a slight boost to saturation with CurvesTransformation, and about 10% addition of LocalHistogramEqualization with Kernel Radius 256, Contrast Limit 1.5 and 10-bit Histogram Resolution.

Stretched the star_mask with ArcsinhStretch, and recombined the stars with the Starless image using PixelMath : max(Starless, star_mask).

This produced a very attractive image with the brownish gas and dust at the lower left clearly visible (this is real, because Olly has also found it in his RASA images of the same target).

This area had a greenish tinge, so I used ColorMask to make and apply a green mask that protected all the rest of the image, and reduced the green channel slightly in CurvesTransformation. Only a slight reduction otherwise this area becomes too red.

And that is as much as I am going to do to this data for the moment. I now have to go back and reprocess some other images!


Attachments (1)
1 year ago
·
#5951
0
Votes
Undo

Indeed, many thanks Richard for sharing this and providing such a comparison. If I have to pick a preferred image, the I would say your last version is the one I prefer. There is a lot of depth in the main nebula and also the surroundings are coming out very nicely.

All the best

Manuel


Manuel
Roboscopes General Technical


1 year ago
·
#5956
0
Votes
Undo

Beautiful job and excellent article as always!

  • Page :
  • 1
There are no replies made for this post yet.
Be one of the first to reply to this post!

Follow Us

Newsletter

Proud to use

  • FLI

  • 656 Imaging

  • 10 Micron

  • Planewave

  • ZWO

Company Details:

Roboscopes

802 Kingsbury Road
Birmingham
B24 9PS
United Kingdom


Roboscopes is a trading name of ENS Optical LTD ¦ Copyright© 2020 Roboscopes
Cron Job Starts